Java メール送信
Java アプリケーションを使用して E-mail を送信するのは非常に簡単ですが、まずお使いのマシンに JavaMail API と Java Activation Framework (JAF) をインストールする必要があります。
- Java のWebサイトから最新バージョンをダウンロードできます。JavaMail、Webページの右側にあるDownloadsリンクをクリックしてダウンロードしてください。
- Java のWebサイトから最新バージョンをダウンロードできます。JAF(バージョン 1.1.1)。
当サイトが提供するダウンロードリンクを使用することもできます:
-
JavaMail mail.jar 1.4.5
-
-
JAF(バージョン 1.1.1) activation.jar
-
ダウンロードして解凍すると、新しく作成されたトップレベルディレクトリに、これら2つのアプリケーションのいくつかの jar ファイルがあります。次のファイルをmail.jarとactivation.jarファイルを CLASSPATH に追加する必要があります。
サードパーティのメールサーバー(QQ の SMTP サーバーなど)を使用する場合は、記事の下部にあるユーザー認証の完全な例を参照してください。
簡単な E-mail を送信する
以下は簡単な E-mail を送信する例です。ローカルホストがネットワークに接続されていることを前提としています。
SendEmail.java ファイルコード:
import java.util.*;
import javax.mail.*;
import javax.mail.internet.*;
import javax.activation.*;
public class SendEmail
{
public static void main(String [] args)
{
String to = "[email protected]";
String from = "[email protected]";
String host = "localhost";
Properties properties = System.getProperties();
properties.setProperty("mail.smtp.host", host);
Session session = Session.getDefaultInstance(properties);
try{
MimeMessage message = new MimeMessage(session);
message.setFrom(new InternetAddress(from));
message.addRecipient(Message.RecipientType.TO,
new InternetAddress(to));
message.setSubject("This is the Subject Line!");
message.setText("This is actual message");
Transport.send(message);
System.out.println("Sent message successfully....");
}catch (MessagingException mex) {
mex.printStackTrace();
}
}
}
このプログラムをコンパイルして実行し、簡単な E-mail を送信します:
$ java SendEmail
Sent message successfully....
複数の受信者に e-mail を送信したい場合は、次のメソッドを使用して複数の受信者 ID を指定します:
void addRecipients(Message.RecipientType type,
Address[] addresses)
throws MessagingException
以下はパラメータの説明です:
HTML E-mail を送信する
以下は HTML E-mail を送信する例です。ローカルホストがネットワークに接続されていることを前提としています。
前の例と非常によく似ていますが、setContent() メソッドを使用して、2番目のパラメータを "text/html" にして、HTML コンテンツを送信することを指定する点が異なります。
SendHTMLEmail.java ファイルコード:
import java.util.*;
import javax.mail.*;
import javax.mail.internet.*;
import javax.activation.*;
public class SendHTMLEmail
{
public static void main(String [] args)
{
String to = "[email protected]";
String from = "[email protected]";
String host = "localhost";
Properties properties = System.getProperties();
properties.setProperty("mail.smtp.host", host);
Session session = Session.getDefaultInstance(properties);
try{
MimeMessage message = new MimeMessage(session);
message.setFrom(new InternetAddress(from));
message.addRecipient(Message.RecipientType.TO,
new InternetAddress(to));
message.setSubject("This is the Subject Line!");
message.setContent("<h1>This is actual message</h1>",
"text/html" );
Transport.send(message);
System.out.println("Sent message successfully....");
}catch (MessagingException mex) {
mex.printStackTrace();
}
}
}
このプログラムをコンパイルして実行し、HTML e-mail を送信します:
$ java SendHTMLEmail
Sent message successfully....
添付ファイル付きの E-mail を送信する
以下は添付ファイル付きの E-mail を送信する例です。ローカルホストがネットワークに接続されていることを前提としています。
SendFileEmail.java ファイルコード:
import java.util.*;
import javax.mail.*;
import javax.mail.internet.*;
import javax.activation.*;
public class SendFileEmail
{
public static void main(String [] args)
{
String to = "[email protected]";
String from = "[email protected]";
String host = "localhost";
Properties properties = System.getProperties();
properties.setProperty("mail.smtp.host", host);
Session session = Session.getDefaultInstance(properties);
try{
MimeMessage message = new MimeMessage(session);
message.setFrom(new InternetAddress(from));
message.addRecipient(Message.RecipientType.TO,
new InternetAddress(to));
message.setSubject("This is the Subject Line!");
BodyPart messageBodyPart = new MimeBodyPart();
messageBodyPart.setText("This is message body");
Multipart multipart = new MimeMultipart();
multipart.addBodyPart(messageBodyPart);
messageBodyPart = new MimeBodyPart();
String filename = "file.txt";
DataSource source = new FileDataSource(filename);
messageBodyPart.setDataHandler(new DataHandler(source));
messageBodyPart.setFileName(filename);
multipart.addBodyPart(messageBodyPart);
message.setContent(multipart );
Transport.send(message);
System.out.println("Sent message successfully....");
}catch (MessagingException mex) {
mex.printStackTrace();
}
}
}
プログラムをコンパイルして実行し、添付ファイル付きのメールを送信します。
$ java SendFileEmail
Sent message successfully....
ユーザー認証のセクション
ユーザー認証のために e-mail サーバーにユーザー名とパスワードを提供する必要がある場合は、次の設定で実行できます:
props.put("mail.smtp.auth", "true");
props.setProperty("mail.user", "myuser");
props.setProperty("mail.password", "mypwd");
e-mail のその他の送信メカニズムは上記と同じです。
ユーザー名とパスワード認証が必要なメール送信の例:
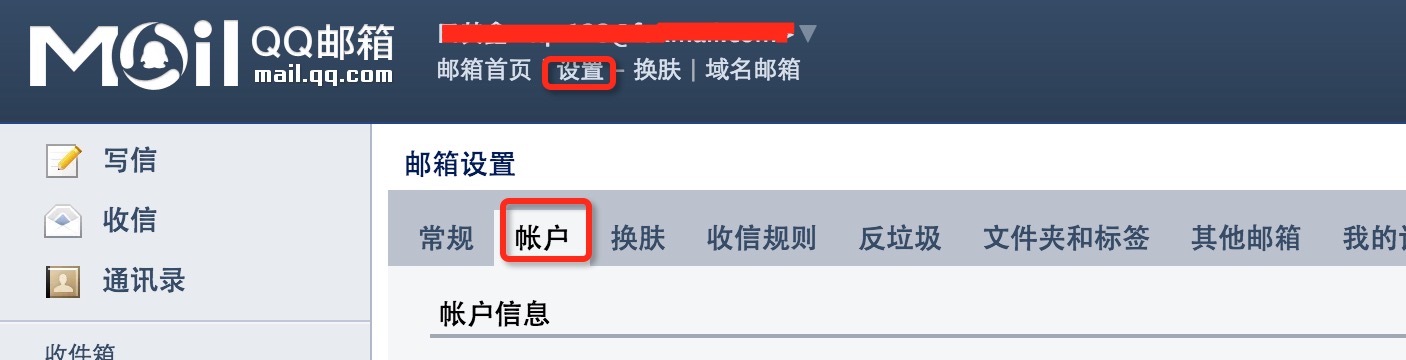
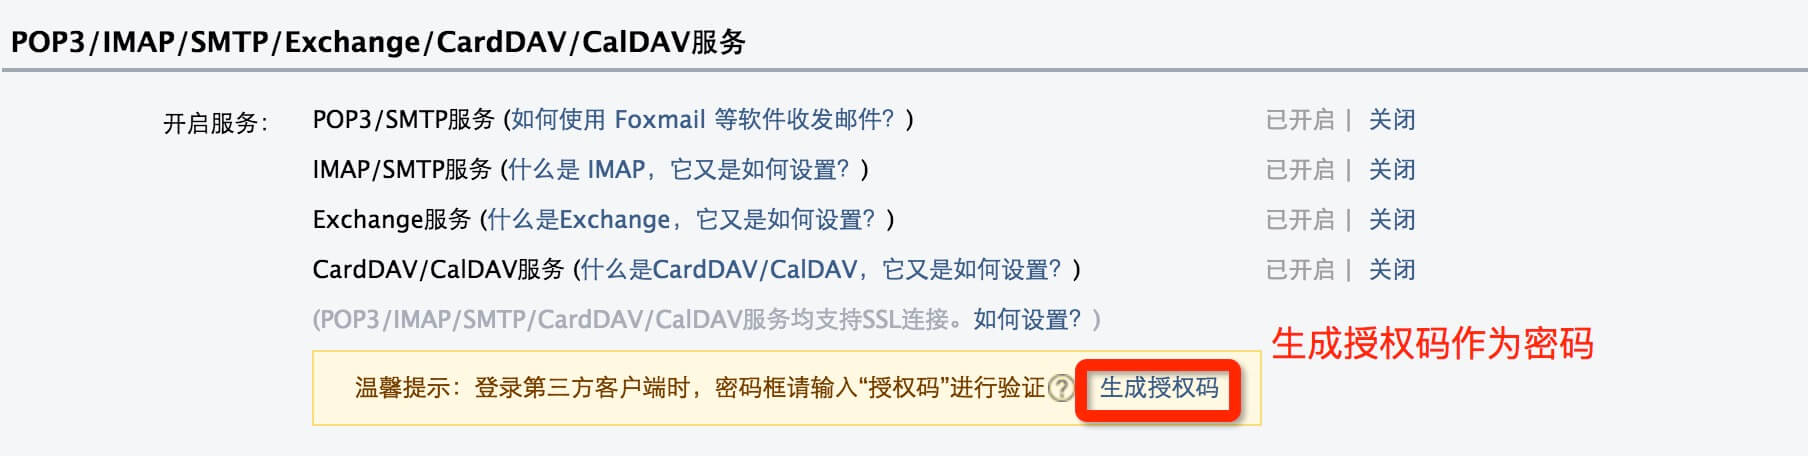
この例では QQ メールサーバーを例にとります。QQ メールの管理画面にログインし、「設定」=》アカウントで POP3/SMTP サービスを有効にする必要があります。下図のとおりです:
QQ メールでは、認証コードを生成してパスワードを設定します:
Java コードは次のとおりです:
SendEmail2.java ファイルコード:
import java.util.Properties;
import javax.mail.Authenticator;
import javax.mail.Message;
import javax.mail.MessagingException;
import javax.mail.PasswordAuthentication;
import javax.mail.Session;
import javax.mail.Transport;
import javax.mail.internet.InternetAddress;
import javax.mail.internet.MimeMessage;
public class SendEmail2
{
public static void main(String [] args)
{
String to = "[email protected]";
String from = "[email protected]";
String host = "smtp.qq.com";
Properties properties = System.getProperties();
properties.setProperty("mail.smtp.host", host);
properties.put("mail.smtp.auth", "true");
Session session = Session.getDefaultInstance(properties,new Authenticator(){
public PasswordAuthentication getPasswordAuthentication()
{
return new PasswordAuthentication("[email protected]", "QQ メールの認証コード");
}
});
try{
MimeMessage message = new MimeMessage(session);
message.setFrom(new InternetAddress(from));
message.addRecipient(Message.RecipientType.TO,
new InternetAddress(to));
message.setSubject("This is the Subject Line!");
message.setText("This is actual message");
Transport.send(message);
System.out.println("Sent message successfully....from example.com");
}catch (MessagingException mex) {
mex.printStackTrace();
}
}
}
その他の拡張