初めてのiPhoneアプリケーションを作成する
では、iOSシミュレータで実行するシンプルなビューアプリ(空のアプリケーション)を作成しましょう。
操作手順は以下のとおりです:
1. Xcodeを開き、新しいXcodeプロジェクトを作成します。

2. 次に「Single View Application(シングルビューアプリケーション)」を選択します。

3. 次に、製品名(アプリケーション名)、組織名、会社識別子(Company Identifier)を入力します。

4. 自動参照カウント(ARC)が選択されていることを確認して、範囲外のリソースを自動的に解放します。「次へ」をクリックします。
5. プロジェクトのディレクトリを選択し、「作成」を選択します。
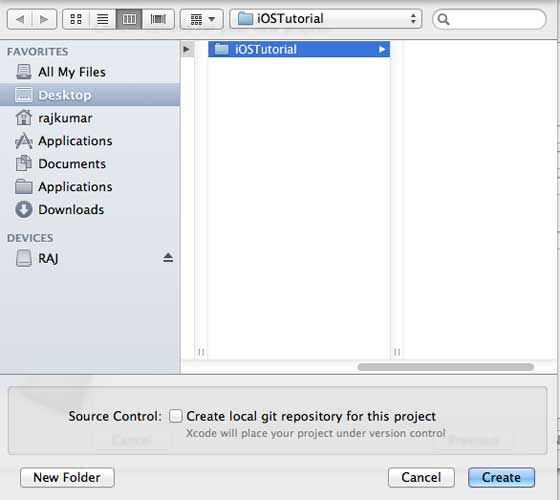
6. 次のようなページが表示されます。

画面上部では、向き、ビルド、リリースを設定できます。デプロイメントターゲット(Deployment Target)があり、デバイスは4.3以降のデプロイメントターゲットをサポートしています。これらは必須ではありません。今はアプリケーションの実行に集中してください。
7. ドロップダウンメニューで「iPhone Simulator」を選択して実行します。

8. 最初のアプリケーションが正常に実行されると、次のような出力が得られます。

背景色を変更して、Interface Builderを使い始めましょう。ViewController.xibを選択します。右側で背景オプションを選択し、色を変更して実行します。

上記のプロジェクトでは、デフォルトでデプロイメントターゲットがiOS 6.0に設定され、自動レイアウト(Auto Layout)が有効になっています。
アプリケーションがiOS 4.3デバイスで正常に動作するように、アプリケーションの作成開始時にデプロイメントターゲットを変更しました。ただし、自動レイアウトは無効にしません。自動レイアウトを無効にするには、ファイルインスペクタの各nib(つまりxibファイル)で「Auto Layout」チェックボックスの選択を解除する必要があります。
XcodeプロジェクトIDEの各部分は次のように表示されます(Apple Xcode 4ユーザードキュメント)

上に示したインスペクタ選択バーにはファイルインスペクタがあり、「Auto Layout」の選択を解除できます。対象デバイスがiOS 6.0のみの場合は、自動レイアウトを使用できます。
もちろん、iOS 6を対象とする場合は、Passbookなどの新機能を使用することもできます。今はiOS 4.3をデプロイメントターゲットにしています。
最初のiOSアプリケーションコードを詳しく理解する
アプリケーションを生成する5つの異なるファイルは次のとおりです。- AppDelegate.h
- AppDelegate.m
- ViewController.h
- ViewController.m
- ViewController.xib
簡単なコードの説明には単一行コメント(//)を使用し、重要なプロジェクトコードの説明はコードの下に記載しています。
AppDelegate.h
// Header File that provides all UI related items.
#import <UIKit/UIKit.h>

 // Forward declaration (Used when class will be defined /imported in future)
@class ViewController;

 // Interface for Appdelegate
@interface AppDelegate : UIResponder <UIApplicationDelegate>

// Property window
@property (strong, nonatomic) UIWindow *window;

 // Property Viewcontroller

 @property (strong, nonatomic) ViewController *viewController;
//this marks end of interface
@end
コードの説明
- AppDelegateはUIResponderを呼び出してiOSイベントを処理します。
- UIApplicationのデリゲートを実装し、起動完了、終了などの主要なアプリケーションイベントを提供します。
- iOSデバイスの画面上でUIWindowオブジェクトを使用してさまざまなビューを管理・調整します。これは、他の読み込まれたビューの基本ビューのようなものです。通常、アプリケーションには1つのウィンドウしかありません。
- UIViewControllerは画面のフローを処理します。
AppDelegate.m
// Imports the class Appdelegate's interface
import "AppDelegate.h"

// Imports the viewcontroller to be loaded
#import "ViewController.h"

// Class definition starts here
@implementation AppDelegate

// Following method intimates us the application launched  successfully
- (BOOL)application:(UIApplication *)application
 didFinishLaunchingWithOptions:(NSDictionary *)launchOptions
{
    self.window = [[UIWindow alloc] initWithFrame:
    [[UIScreen mainScreen] bounds]];
    // Override point for customization after application launch.
    self.viewController = [[ViewController alloc]
     initWithNibName:@"ViewController" bundle:nil];
    self.window.rootViewController = self.viewController;
    [self.window makeKeyAndVisible];
    return YES;
}

- (void)applicationWillResignActive:(UIApplication *)application
{
    /* Sent when the application is about to move from active to inactive state.
    This can occur for certain types of temporary interruptions
    (such as an incoming phone call or SMS message)
    or when the user quits the application and it begins the transition to the
    background state. Use this method to pause ongoing tasks, disable timers,
    and throttle down OpenGL ES frame rates. Games should use this method
    to pause the game.*/
}

- (void)applicationDidEnterBackground:(UIApplication *)application
{
    /* Use this method to release shared resources, save user data, invalidate
    timers, and store enough application state information    to restore your
    application to its current state in case it is terminated later. If your
    application supports background execution, this method is called instead
    of applicationWillTerminate: when the user quits.*/
}

- (void)applicationWillEnterForeground:(UIApplication *)application
{
    /* Called as part of the transition from the background to the inactive state;
    here you can undo many of the changes made on entering the background.*/
}

- (void)applicationDidBecomeActive:(UIApplication *)application
{
    /* Restart any tasks that were paused (or not yet started) while the
    application was inactive. If the application was previously in the background,
    optionally refresh the user interface.*/
}

- (void)applicationWillTerminate:(UIApplication *)application
{
    /* Called when the application is about to terminate. Save data if appropriate.
    See also applicationDidEnterBackground:. */
}

@end
コードの説明
- ここでUIApplicationを定義します。上で定義されているすべてのメソッドはアプリケーションのUI呼び出しであり、ユーザー定義のメソッドは含まれていません。
- UIWindowオブジェクトは、アプリケーションのオブジェクトを保持するために割り当てられます。
- UIViewControllerがウィンドウの初期ビューコントローラとして設定されます。
- makeKeyAndVisibleを呼び出すと、ウィンドウが表示されます。
ViewController.h
#import

// Interface for class ViewController
@interface ViewController : UIViewController

@end
コードの説明
- ViewControllerクラスはUIViewControllerを継承し、iOSアプリケーションに基本的なビュー管理モデルを提供します。
ViewController.m
#import "ViewController.h"

// Category, an extension of ViewController class
@interface ViewController ()

@end

@implementation ViewController

- (void)viewDidLoad
{
    [super viewDidLoad];
    // Do any additional setup after loading the view, typically from a nib.
}

- (void)didReceiveMemoryWarning
{
    [super didReceiveMemoryWarning];
    // Dispose of any resources that can be recreated.
}

@end
コードの説明
- ここでは、UIViewControllerクラスの基本クラスで定義されている2つのメソッドを実装しています。
- 初期ビューのロード後に呼び出されるセットアップ用メソッドをviewDidLoadで実装します。
- メモリ警告が発生した場合にdidReceiveMemoryWarningが呼び出されます。