初めての Swagger ドキュメントを作成する
Swagger (OpenAPI) は、RESTful Web サービスを記述・生成・可視化するための仕様とツールセットです。
以下では、ゼロから最初の Swagger ドキュメントを書く方法を詳しく説明します。
Swagger ドキュメントは主に YAML または JSON 形式を使用し、API のさまざまな側面を定義します。内容は次のとおりです。
- API の基本情報(タイトル、バージョンなど)
- 利用可能なパスと操作
- 入力パラメータと出力レスポンス
- 認証方法
- データモデルの定義
作成手順
1. 基本的なファイル構造を作成する
まず、次の名前のファイルを作成します。swagger.yaml 或 swagger.jsonこのチュートリアルでは、読み書きが容易な YAML 形式を例として使用します。
例
openapi: 3.0.0
info:
title:私の最初のAPI
description:これは簡単なAPIサンプルドキュメントです
version: 1.0.0
contact:
name:API サポートチーム
email: support@example.com
url: https://www.example.com/support
servers:
- url: https://api.example.com/v1
description:本番環境
- url: https://dev-api.example.com/v1
description:開発環境
info:
title:私の最初のAPI
description:これは簡単なAPIサンプルドキュメントです
version: 1.0.0
contact:
name:API サポートチーム
email: support@example.com
url: https://www.example.com/support
servers:
- url: https://api.example.com/v1
description:本番環境
- url: https://dev-api.example.com/v1
description:開発環境
2. ドキュメントの基本情報を追加する
例
openapi: 3.0.0
info:
title:私の最初のAPI
description:これは簡単なAPIサンプルドキュメントです
version: 1.0.0
contact:
name:API サポートチーム
email: support@example.com
url: https://www.example.com/support
servers:
- url: https://api.example.com/v1
description:本番環境
- url: https://dev-api.example.com/v1
description:開発環境
info:
title:私の最初のAPI
description:これは簡単なAPIサンプルドキュメントです
version: 1.0.0
contact:
name:API サポートチーム
email: support@example.com
url: https://www.example.com/support
servers:
- url: https://api.example.com/v1
description:本番環境
- url: https://dev-api.example.com/v1
description:開発環境
3. パスと操作を定義する
パスは API がアクセスできるエンドポイントを定義し、操作はそれらのエンドポイントに対して実行できる HTTP メソッド(GET、POST、PUT、DELETE など)を定義します。
例
paths:
/users:
get:
summary:すべてのユーザーリストを取得
description:システム内のすべてのユーザー情報を返します
operationId: getUsers
parameters:
- name: limit
in: query
description:返される結果の最大数
required: false
schema:
type: integer
format: int32
minimum: 1
maximum: 100
default: 20
responses:
'200':
description:ユーザーリストの取得成功
content:
application/json:
schema:
type: array
items:
$ref: '#/components/schemas/User'
'400':
description:無効なリクエスト
content:
application/json:
schema:
$ref: '#/components/schemas/Error'
post:
summary:新しいユーザーを作成
description:システムに新しいユーザーを作成します
operationId: createUser
requestBody:
description:ユーザー情報
required: true
content:
application/json:
schema:
$ref: '#/components/schemas/NewUser'
responses:
'201':
description:ユーザー作成成功
content:
application/json:
schema:
$ref: '#/components/schemas/User'
'400':
description:無効なリクエスト
content:
application/json:
schema:
$ref: '#/components/schemas/Error'
/users:
get:
summary:すべてのユーザーリストを取得
description:システム内のすべてのユーザー情報を返します
operationId: getUsers
parameters:
- name: limit
in: query
description:返される結果の最大数
required: false
schema:
type: integer
format: int32
minimum: 1
maximum: 100
default: 20
responses:
'200':
description:ユーザーリストの取得成功
content:
application/json:
schema:
type: array
items:
$ref: '#/components/schemas/User'
'400':
description:無効なリクエスト
content:
application/json:
schema:
$ref: '#/components/schemas/Error'
post:
summary:新しいユーザーを作成
description:システムに新しいユーザーを作成します
operationId: createUser
requestBody:
description:ユーザー情報
required: true
content:
application/json:
schema:
$ref: '#/components/schemas/NewUser'
responses:
'201':
description:ユーザー作成成功
content:
application/json:
schema:
$ref: '#/components/schemas/User'
'400':
description:無効なリクエスト
content:
application/json:
schema:
$ref: '#/components/schemas/Error'
4. コンポーネントとモデルを定義する
にcomponents再利用可能なモデルを定義する部分:
例
components:
schemas:
User:
type: object
properties:
id:
type: integer
format: int64
description:ユーザー一意ID
username:
type: string
description:ユーザー名
email:
type: string
format: email
description:ユーザーメール
status:
type: string
enum: [active, inactive, banned]
description:ユーザーステータス
createdAt:
type: string
format: date-time
description:作成時刻
required:
- id
- username
- email
- status
NewUser:
type: object
properties:
username:
type: string
description:ユーザー名
email:
type: string
format: email
description:ユーザーメール
password:
type: string
format: password
description:ユーザーパスワード
minLength: 8
required:
- username
- email
- password
Error:
type: object
properties:
code:
type: integer
format: int32
message:
type: string
required:
- code
- message
schemas:
User:
type: object
properties:
id:
type: integer
format: int64
description:ユーザー一意ID
username:
type: string
description:ユーザー名
email:
type: string
format: email
description:ユーザーメール
status:
type: string
enum: [active, inactive, banned]
description:ユーザーステータス
createdAt:
type: string
format: date-time
description:作成時刻
required:
- id
- username
- status
NewUser:
type: object
properties:
username:
type: string
description:ユーザー名
email:
type: string
format: email
description:ユーザーメール
password:
type: string
format: password
description:ユーザーパスワード
minLength: 8
required:
- username
- password
Error:
type: object
properties:
code:
type: integer
format: int32
message:
type: string
required:
- code
- message
5. セキュリティ定義を追加する
API のセキュリティ要件を定義します:
例
security:
- bearerAuth: []
components:
securitySchemes:
bearerAuth:
type: http
scheme: bearer
bearerFormat: JWT
- bearerAuth: []
components:
securitySchemes:
bearerAuth:
type: http
scheme: bearer
bearerFormat: JWT
6. 完全なドキュメントの例
上記のすべての部分を組み合わせると、完全な Swagger ドキュメントが完成します。
例
openapi: 3.0.0
info:
title:私の最初のAPI
description:これは簡単なAPIサンプルドキュメントです
version: 1.0.0
contact:
name:API サポートチーム
email: support@example.com
url: https://www.example.com/support
servers:
- url: https://api.example.com/v1
description:本番環境
- url: https://dev-api.example.com/v1
description:開発環境
paths:
/users:
get:
summary:すべてのユーザーリストを取得
description:システム内のすべてのユーザー情報を返します
operationId: getUsers
parameters:
- name: limit
in: query
description:返される結果の最大数
required: false
schema:
type: integer
format: int32
minimum: 1
maximum: 100
default: 20
responses:
'200':
description:ユーザーリストの取得成功
content:
application/json:
schema:
type: array
items:
$ref: '#/components/schemas/User'
'400':
description:無効なリクエスト
content:
application/json:
schema:
$ref: '#/components/schemas/Error'
post:
summary:新しいユーザーを作成
description:システムに新しいユーザーを作成します
operationId: createUser
requestBody:
description:ユーザー情報
required: true
content:
application/json:
schema:
$ref: '#/components/schemas/NewUser'
responses:
'201':
description:ユーザー作成成功
content:
application/json:
schema:
$ref: '#/components/schemas/User'
'400':
description:無効なリクエスト
content:
application/json:
schema:
$ref: '#/components/schemas/Error'
components:
schemas:
User:
type: object
properties:
id:
type: integer
format: int64
description:ユーザー一意ID
username:
type: string
description:ユーザー名
email:
type: string
format: email
description:ユーザーメール
status:
type: string
enum: [active, inactive, banned]
description:ユーザーステータス
createdAt:
type: string
format: date-time
description:作成時刻
required:
- id
- username
- email
- status
NewUser:
type: object
properties:
username:
type: string
description:ユーザー名
email:
type: string
format: email
description:ユーザーメール
password:
type: string
format: password
description:ユーザーパスワード
minLength: 8
required:
- username
- email
- password
Error:
type: object
properties:
code:
type: integer
format: int32
message:
type: string
required:
- code
- message
securitySchemes:
bearerAuth:
type: http
scheme: bearer
bearerFormat: JWT
security:
- bearerAuth: []
info:
title:私の最初のAPI
description:これは簡単なAPIサンプルドキュメントです
version: 1.0.0
contact:
name:API サポートチーム
email: support@example.com
url: https://www.example.com/support
servers:
- url: https://api.example.com/v1
description:本番環境
- url: https://dev-api.example.com/v1
description:開発環境
paths:
/users:
get:
summary:すべてのユーザーリストを取得
description:システム内のすべてのユーザー情報を返します
operationId: getUsers
parameters:
- name: limit
in: query
description:返される結果の最大数
required: false
schema:
type: integer
format: int32
minimum: 1
maximum: 100
default: 20
responses:
'200':
description:ユーザーリストの取得成功
content:
application/json:
schema:
type: array
items:
$ref: '#/components/schemas/User'
'400':
description:無効なリクエスト
content:
application/json:
schema:
$ref: '#/components/schemas/Error'
post:
summary:新しいユーザーを作成
description:システムに新しいユーザーを作成します
operationId: createUser
requestBody:
description:ユーザー情報
required: true
content:
application/json:
schema:
$ref: '#/components/schemas/NewUser'
responses:
'201':
description:ユーザー作成成功
content:
application/json:
schema:
$ref: '#/components/schemas/User'
'400':
description:無効なリクエスト
content:
application/json:
schema:
$ref: '#/components/schemas/Error'
components:
schemas:
User:
type: object
properties:
id:
type: integer
format: int64
description:ユーザー一意ID
username:
type: string
description:ユーザー名
email:
type: string
format: email
description:ユーザーメール
status:
type: string
enum: [active, inactive, banned]
description:ユーザーステータス
createdAt:
type: string
format: date-time
description:作成時刻
required:
- id
- username
- status
NewUser:
type: object
properties:
username:
type: string
description:ユーザー名
email:
type: string
format: email
description:ユーザーメール
password:
type: string
format: password
description:ユーザーパスワード
minLength: 8
required:
- username
- password
Error:
type: object
properties:
code:
type: integer
format: int32
message:
type: string
required:
- code
- message
securitySchemes:
bearerAuth:
type: http
scheme: bearer
bearerFormat: JWT
security:
- bearerAuth: []
7. Swagger ツールを使用する
Swagger ドキュメントを可視化・テストする方法はいくつかあります:
- Swagger UI:インタラクティブなドキュメントページ
- Swagger Editor:オンラインエディタで、ドキュメントをリアルタイムでプレビューできます
- Swagger Codegen:クライアントコードを生成するツール
8. ドキュメントをオンラインでテストする
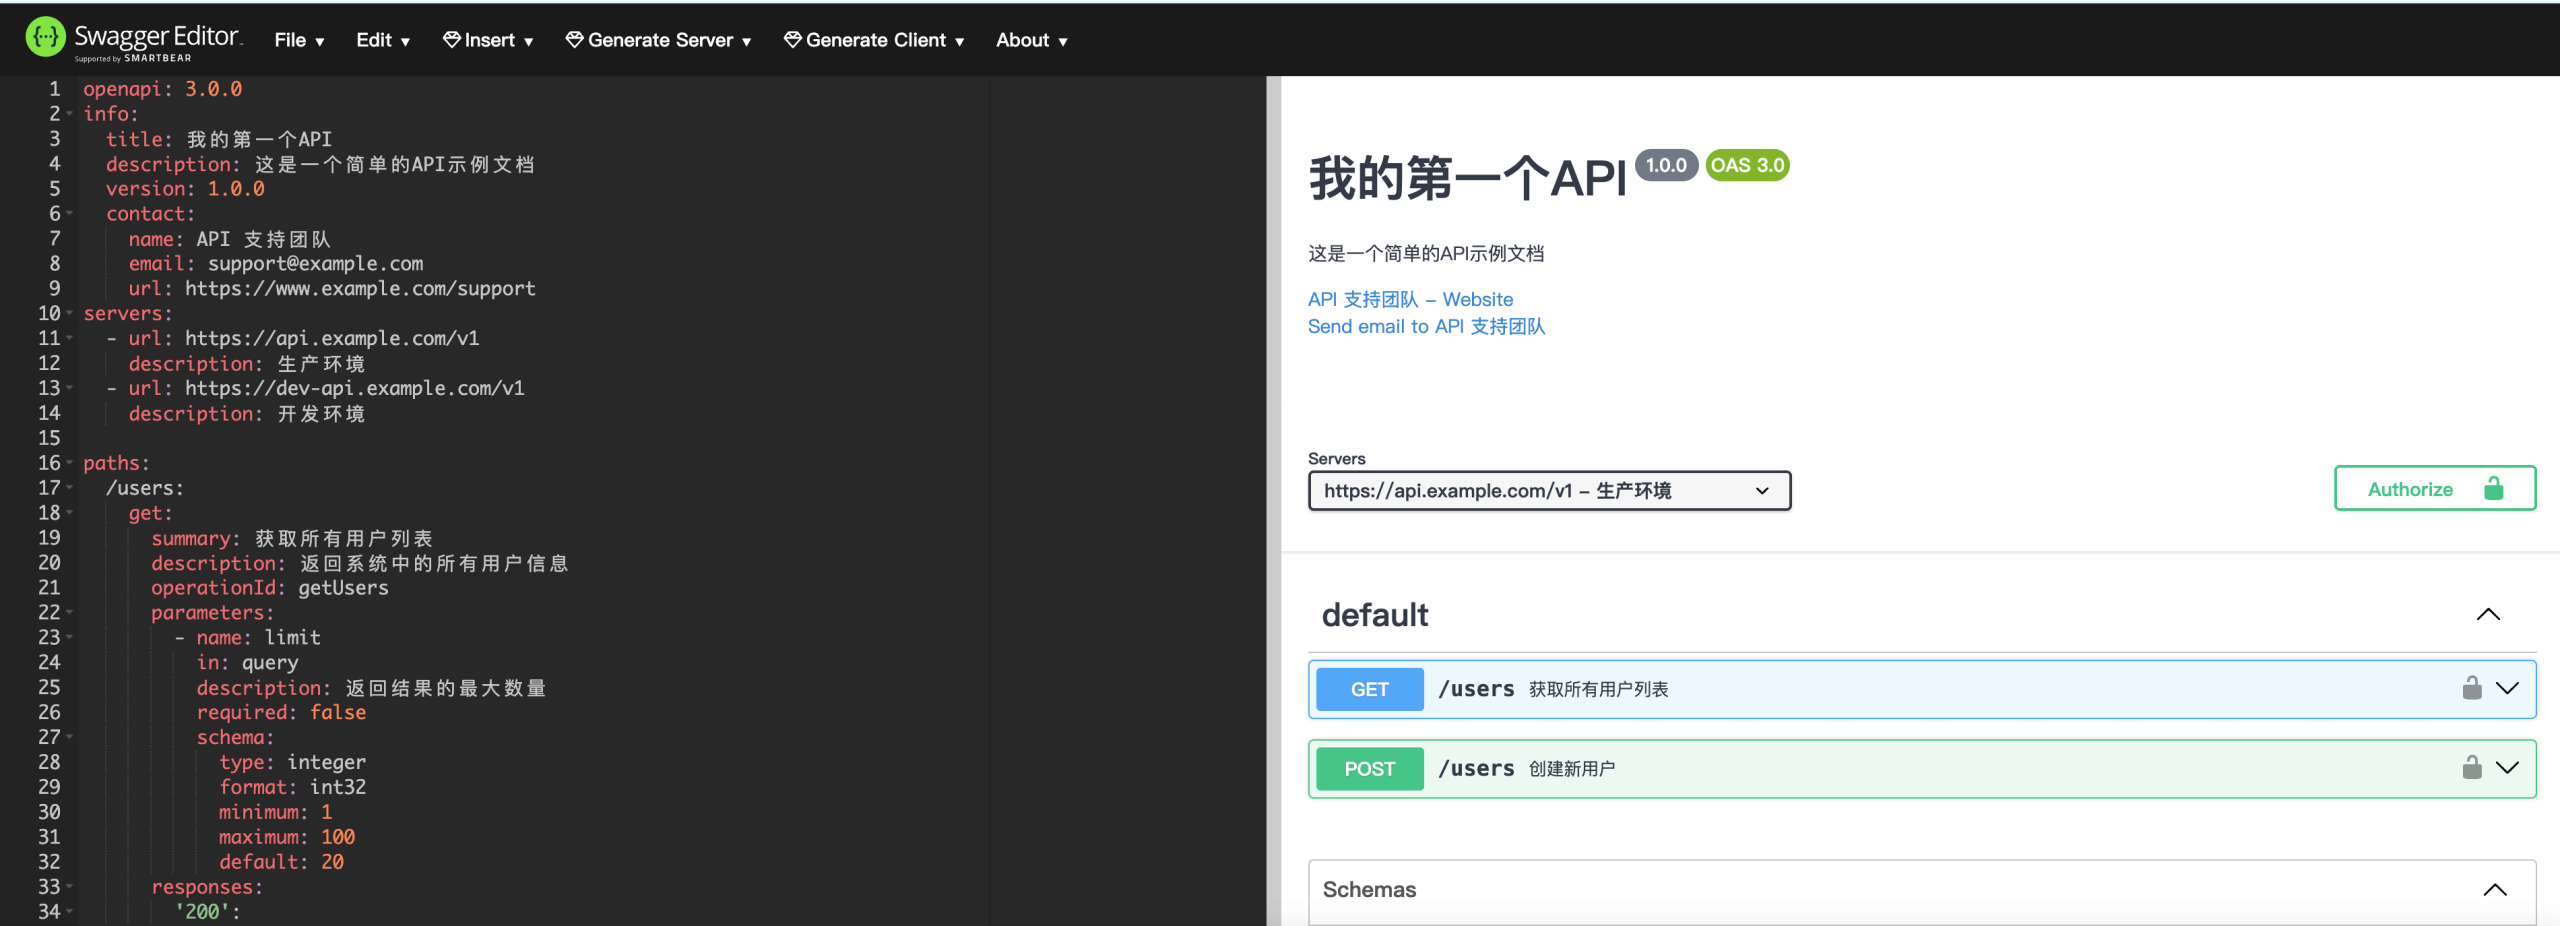
次を使用できます:Swagger Editorオンラインでドキュメントをテストできます。YAML または JSON をエディターにコピー&ペーストするだけで、右側のパネルに視覚化された API ドキュメントが表示されます。
9. ベストプラクティス
- 意味のある操作 ID を使用する
- 各エンドポイントに詳細な説明を提供する
- すべてのパラメータに説明があることを確認する
- 考えられるすべてのレスポンスステータスコードを記録する
- モデル参照を使用して重複を減らす
- ドキュメントを最新に保つ
- 各エンドポイントにサンプルリクエストとレスポンスを追加する
10. 一般的なパラメータの位置
Swagger はいくつかのパラメータの位置を定義しています:
path:URL パス内のパラメータ(例:)/users/{id}query:URL クエリパラメータ(例:)/users?limit=10header:HTTP ヘッダーパラメータcookie:Cookie パラメータbody:リクエストボディパラメータ(OpenAPI 3.0 では requestBody が代わりに使用されます)
11. ドキュメントを拡張する
API の進化に合わせて、Swagger ドキュメントを拡張し続けましょう:
- さらにエンドポイントを追加する
- 追加のモデルを定義する
- より詳細な説明を追加する
- リクエストとレスポンスの例を追加する
12. 実際の開発への統合
実際の開発では、次のことができます:
- Swagger をコードに統合する
- 自動生成ツールを使用する
- コードコメントからドキュメントを生成する
- Swagger UI をアプリケーションに埋め込む