Angular 2 フォーム
この章では、コンポーネントとテンプレートを使用して Angular フォームを構築する方法を紹介します。
Angular テンプレートを使用すると、ログインフォーム、連絡先フォーム、商品詳細フォームなど、さまざまなタイプのフォームを作成できます。また、これらのフォームのフィールドにデータ検証を追加することもできます。
次に、フォームの機能を段階的に実装していきます。
プロジェクトの作成
初期プロジェクトをインポートします。
完全なプロジェクトの作成は、以下を参照してください:Angular 2 TypeScript 環境設定
またはソースコードを直接ダウンロード:クリックしてダウンロード
解凍後、ディレクトリ名を angular-forms に変更し、angular-forms/package.json ファイル内の"name": "angular-quickstart"ために"name": "angular-forms"。
完了したら、以下を実行します。cnpm install依存パッケージを読み込むためです。
Site モデルの作成
以下では、3つの必須フィールド(id、name、url)と1つのオプションフィールド(alexa)を含む単純なモデルクラス Site を作成します。
angular-forms/app ディレクトリに site.ts ファイルを作成します。コードは次のとおりです。
app/site.ts ファイル:
export class Site {
constructor(
public id: number,
public name: string,
public url: string,
public alexa?: number
) { }
}
次のコードでは、public とマークされたものがパブリックフィールドで、alexa の後に疑問符(?)を付けるとオプションフィールドを表します。
フォームコンポーネントを作成する
各 Angular フォームは2つの部分に分かれています。HTML ベースのテンプレートと、データとユーザー操作を処理するコードベースのコンポーネントです。
angular-forms/app ディレクトリに site-form.component.ts ファイルを作成します。コードは次のとおりです。
app/site-form.component.ts ファイル:
import { Component } from '@angular/core';
import { Site } from './site';
@Component({
moduleId: module.id,
selector: 'site-form',
templateUrl: 'site-form.component.html'
})
export class SiteFormComponent {
urls = ['www.example.com', 'www.google.com',
'www.taobao.com', 'www.facebook.com'];
model = new Site(1, 'サンプル', this.urls[0], 10000);
submitted = false;
onSubmit() { this.submitted = true; }
get diagnostic() { return JSON.stringify(this.model); }
}
この例では、Component デコレーターと Site モデルをインポートしています。
@Component セレクター "site-form" は、<site-form> タグを介して<site-form>このフォームを親テンプレートに組み込むことができることを示しています。
templateUrl プロパティは、site-form.component.html という独立した HTML テンプレートファイルを指します。
diagnostic プロパティは、このモデルの JSON 形式を返すために使用されます。
アプリケーションのルートモジュールを定義する
app.module.ts を修正してアプリケーションのルートモジュールを定義します。モジュール内では、参照される外部コンポーネントや、このモジュールに属するコンポーネント(SiteFormComponent など)を指定します。
テンプレート駆動フォームには専用のモジュールがあるため、このアプリケーションの imports 配列に FormsModule を追加する必要があります。これにより、フォームを使用できるようになります。
app/app.module.ts ファイルのコードは次のとおりです。
app/app.module.ts ファイル:
import { NgModule } from '@angular/core';
import { BrowserModule } from '@angular/platform-browser';
import { FormsModule } from '@angular/forms';
import { AppComponent } from './app.component';
import { SiteFormComponent } from './site-form.component';
@NgModule({
imports: [
BrowserModule,
FormsModule
],
declarations: [
AppComponent,
SiteFormComponent
],
bootstrap: [ AppComponent ]
})
export class AppModule { }
ルートコンポーネントを作成する
ルートコンポーネントファイル app.component.ts を修正して、SiteFormComponent をその中に配置します。
app/app.component.ts ファイル:
import { Component } from '@angular/core';
@Component({
selector: 'my-app',
template: '<site-form></site-form>'
})
export class AppComponent { }
初期 HTML フォームテンプレートを作成する
テンプレートファイル site-form.component.html を作成します。コードは次のとおりです。
app/site-form.component.html ファイル:
<div class="container">
<h1>サイトフォーム</h1>
<form>
<div class="form-group">
<label for="name">サイト名</label>
<input type="text" class="form-control" id="name" required>
</div>
<div class="form-group">
<label for="alexa">alexa ランキング</label>
<input type="text" class="form-control" id="alexa">
</div>
<button type="submit" class="btn btn-default">送信</button>
</form>
</div>
required 属性はそのフィールドを必須フィールドに設定します。設定されていない場合はオプションです。
angular-forms ディレクトリで次のコマンドを入力します:
cnpm install bootstrap --save
index.html ファイルを開き、以下のスタイルリンクを <head> に追加します:
<link rel="stylesheet" href="node_modules/bootstrap/dist/css/bootstrap.min.css">
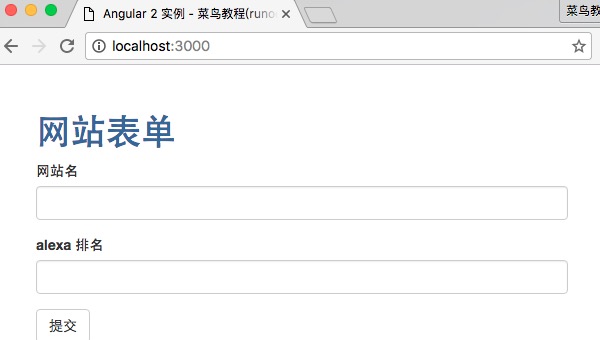
実行npm startその後、http://localhost:3000/ にアクセスすると、出力結果は次のようになります:
ngModel を使用した双方向データバインディング
次に、ngModel を使用して双方向データバインディングを行います。DOM イベントをリッスンすることで、コンポーネントのプロパティを更新します。
app/site-form.component.html を修正し、ngModel を使用してフォームをモデルにバインドします。コードは次のとおりです。
app/site-form.component.html ファイル:
<div class="container">
<h1>サイトフォーム</h1>
<form>
{{diagnostic}}
<div class="form-group">
<label for="name">サイト名</label>
<input type="text" class="form-control" id="name"
required
[(ngModel)]="model.name" name="name">
</div>
<div class="form-group">
<label for="alexa">alexa ランキング</label>
<input type="text" class="form-control" id="alexa"
[(ngModel)]="model.alexa" name="alexa">
</div>
<div class="form-group">
<label for="url">サイト URL</label>
<select class="form-control" id="url"
required
[(ngModel)]="model.url" name="url">
<option *ngFor="let p of urls" [value]="p">{{p}}</option>
</select>
</div>
<button type="submit" class="btn btn-default">送信</button>
</form>
</div>
上記の例を実行すると、出力結果は次のようになります:
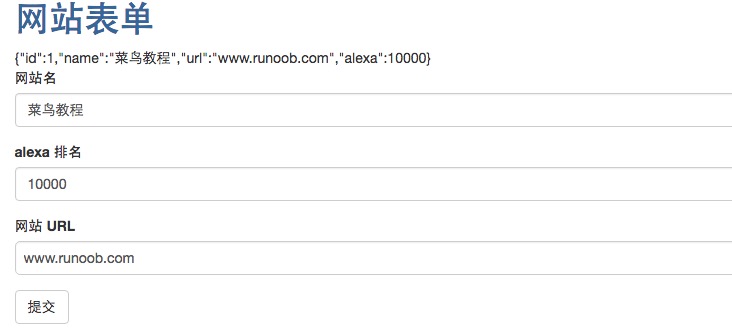
{{diagnostic}} テスト時にデータを出力するためだけに使用されます。
また、ngModel を使用して変更状態と有効性検証を追跡できます。ngModel は3つの CSS クラスを使用してコントロールを更新し、現在の状態を反映します。
| 状態 |
true の場合のクラス |
false の場合のクラス |
| コントロールが訪問済みである |
ng-touched
|
ng-untouched
|
| コントロールの値が変更された |
ng-dirty
|
ng-pristine
|
| コントロールの値が有効である |
ng-valid
|
ng-invalid
|
これにより、フォームの状態を反映するカスタム CSS を追加できます。
angular-forms ディレクトリに forms.css ファイルを作成します。コードは次のとおりです。
forms.css ファイル:
.ng-valid[required], .ng-valid.required {
border-left: 5px solid #4276A9;
}
.ng-invalid:not(form) {
border-left: 5px solid #a94442;
}
index.html ファイルを開き、以下のスタイルリンクを <head> に追加します:
<link rel="stylesheet" href="forms.css">
app/site-form.component.html を修正します。コードは次のとおりです。
app/site-form.component.html ファイル:
<div class="container">
<h1>サイトフォーム</h1>
<form>
{{diagnostic}}
<div class="form-group">
<label for="name">サイト名</label>
<input type="text" class="form-control" id="name"
required
[(ngModel)]="model.name" name="name"
#name="ngModel" >
<div [hidden]="name.valid || name.pristine"
class="alert alert-danger">サイト名は必須です</div>
</div>
<div class="form-group">
<label for="alexa">alexa ランキング</label>
<input type="text" class="form-control" id="alexa"
[(ngModel)]="model.alexa" name="alexa">
</div>
<div class="form-group">
<label for="url">サイト URL</label>
<select class="form-control" id="url"
required
[(ngModel)]="model.url" name="url">
<option *ngFor="let p of urls" [value]="p">{{p}}</option>
</select>
</div>
<button type="submit" class="btn btn-default">送信</button>
</form>
</div>
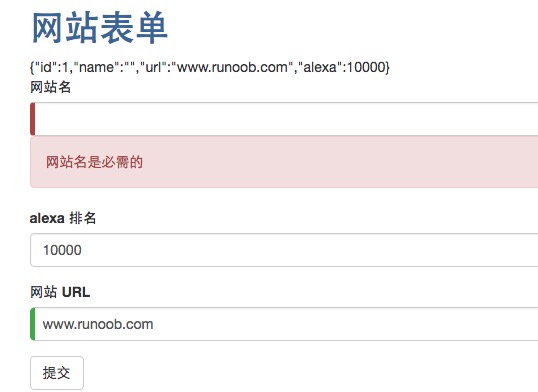
テンプレートでは、div 要素の hidden 属性を name コントロールのプロパティにバインドすることで、"name" フィールドのエラーメッセージの表示/非表示を制御できます。
name フィールドのデータを削除すると、表示結果は次のようになります:
ウェブサイトを追加する
次に、ウェブサイトを追加するためのフォームを作成します。app/site-form.component.html にボタンを追加します:
app/site-form.component.html ファイル:
<button type="button" class="btn btn-default" (click)="newSite()">サイトを追加</button>
上記のボタンイベントをコンポーネントメソッドにバインドします:
app/site-form.component.ts ファイル:
active = true;
newSite() {
this.model = new Site(5, '', '');
this.active = false;
setTimeout(() => this.active = true, 0);
}
コンポーネントに active マーカーを追加し、それを true に初期化します。新しいウェブサイトを追加すると、active マーカーを false に設定し、その後、素早い setTimeout 関数で true に戻します。
ngSubmit を使用したフォーム送信
Angular のディレクティブ NgSubmit を使用してフォームを送信し、イベントバインディング機構を介して SiteFormComponent.submit() メソッドにバインドできます。
<form *ngIf="active" (ngSubmit)="onSubmit()" #siteForm="ngForm">
テンプレート参照変数 #siteForm を定義し、それを "ngForm" に初期化します。
この siteForm 変数は現在 NgForm ディレクティブを参照しており、それはフォーム全体を表します。
site-form.component.ts ファイルの完全なコードは次のとおりです。
app/site-form.component.ts ファイル:
import { Component } from '@angular/core';
import { Site } from './site';
@Component({
moduleId: module.id,
selector: 'site-form',
templateUrl: 'site-form.component.html'
})
export class SiteFormComponent {
urls = ['www.example.com', 'www.google.com',
'www.taobao.com', 'www.facebook.com'];
model = new Site(1, 'サンプル', this.urls[0], 10000);
submitted = false;
onSubmit() { this.submitted = true; }
get diagnostic() { return JSON.stringify(this.model); }
active = true;
newSite() {
this.model = new Site(5, '', '');
this.active = false;
setTimeout(() => this.active = true, 0);
}
}
app/site-form.component.html の完全なコードは次のとおりです。
app/site-form.component.html ファイル:
<div class="container">
<div [hidden]="submitted">
<h1>サイトフォーム</h1>
<form *ngIf="active" (ngSubmit)="onSubmit()" #siteForm="ngForm">
{{diagnostic}}
<div class="form-group">
<label for="name">サイト名</label>
<input type="text" class="form-control" id="name"
required
[(ngModel)]="model.name" name="name"
#name="ngModel" >
<div [hidden]="name.valid || name.pristine"
class="alert alert-danger">サイト名は必須です</div>
</div>
<div class="form-group">
<label for="alexa">alexa ランキング</label>
<input type="text" class="form-control" id="alexa"
[(ngModel)]="model.alexa" name="alexa">
</div>
<div class="form-group">
<label for="url">サイト URL</label>
<select class="form-control" id="url"
required
[(ngModel)]="model.url" name="url">
<option *ngFor="let p of urls" [value]="p">{{p}}</option>
</select>
</div>
<button type="submit" class="btn btn-default" [disabled]="!siteForm.form.valid">送信</button>
<button type="button" class="btn btn-default" (click)="newSite()">サイトを追加</button>
</form>
</div>
<div [hidden]="!submitted">
<h2>送信した情報は次のとおりです。</h2>
<div class="row">
<div class="col-xs-3">サイト名</div>
<div class="col-xs-9 pull-left">{{ model.name }}</div>
</div>
<div class="row">
<div class="col-xs-3">サイトの alexa ランキング</div>
<div class="col-xs-9 pull-left">{{ model.alexa }}</div>
</div>
<div class="row">
<div class="col-xs-3">サイト URL</div>
<div class="col-xs-9 pull-left">{{ model.url }}</div>
</div>
<br>
<button class="btn btn-default" (click)="submitted=false">編集</button>
</div>
</div>
テンプレートでは、hidden 属性を SiteFormComponent.submitted プロパティにバインドします。
メインフォームは最初から表示されています。これは submitted プロパティが false であるためです。フォームを送信すると非表示になります。そのとき submitted プロパティは true です:
submitted = false;
onSubmit() { this.submitted = true; }
最終的なディレクトリ構造は次のとおりです。
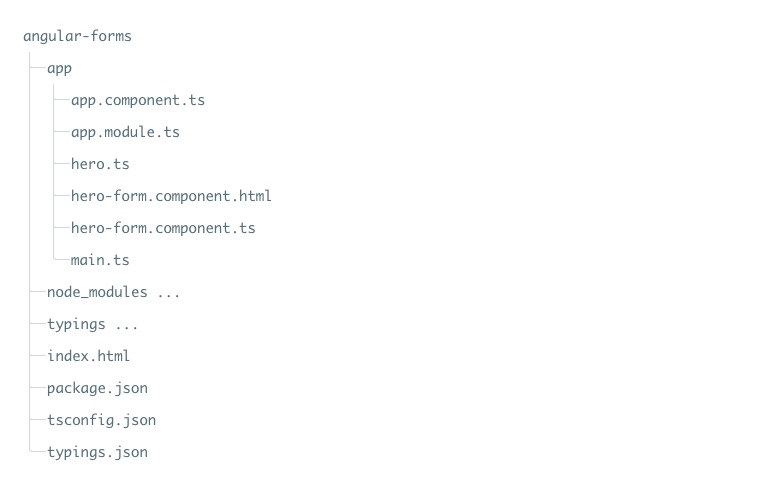
この記事で使用したソースコードは以下の方法でダウンロードできます。node_modules と typings ディレクトリは含まれません。
ソースコードのダウンロード
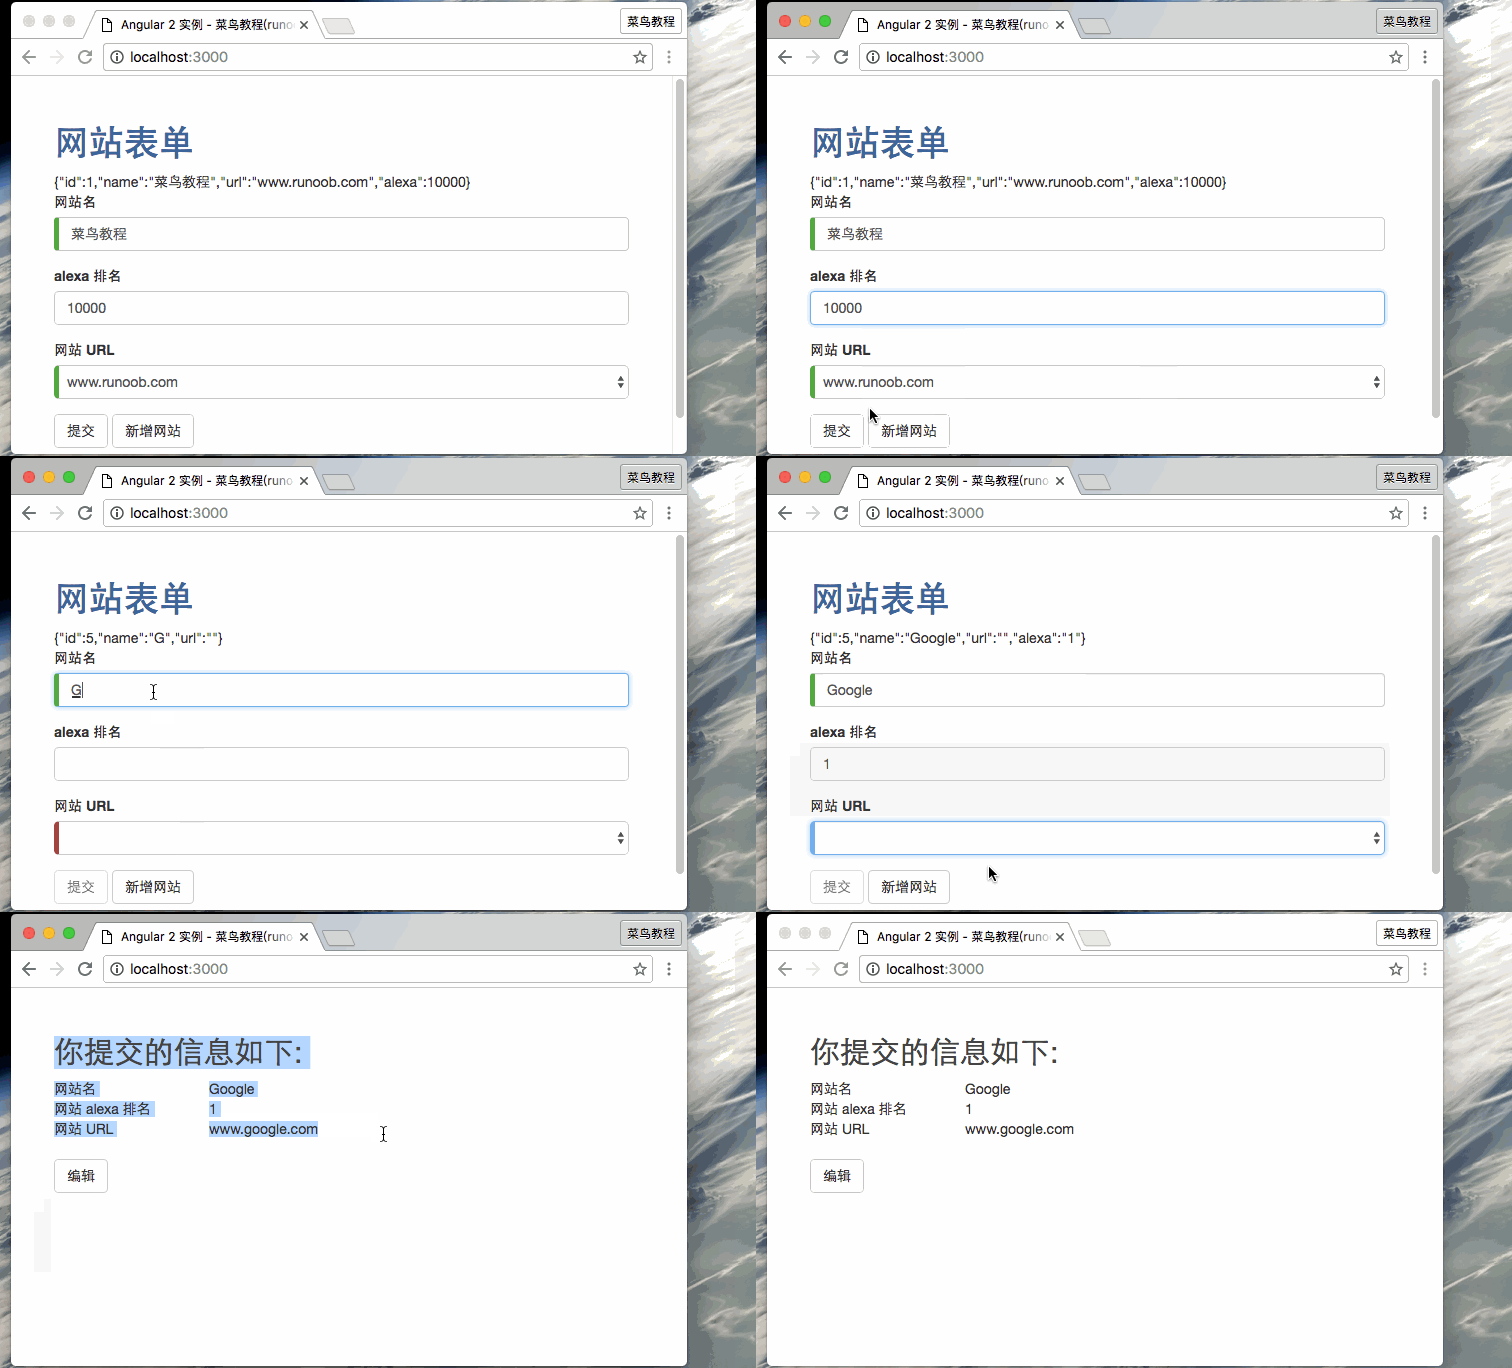
完全なサンプルデモ GIF は次のとおりです。
その他の拡張