Installer Python avec Docker
Méthode 1 : docker pull python:3.5
RechercherDocker Hubl'image Python sur :
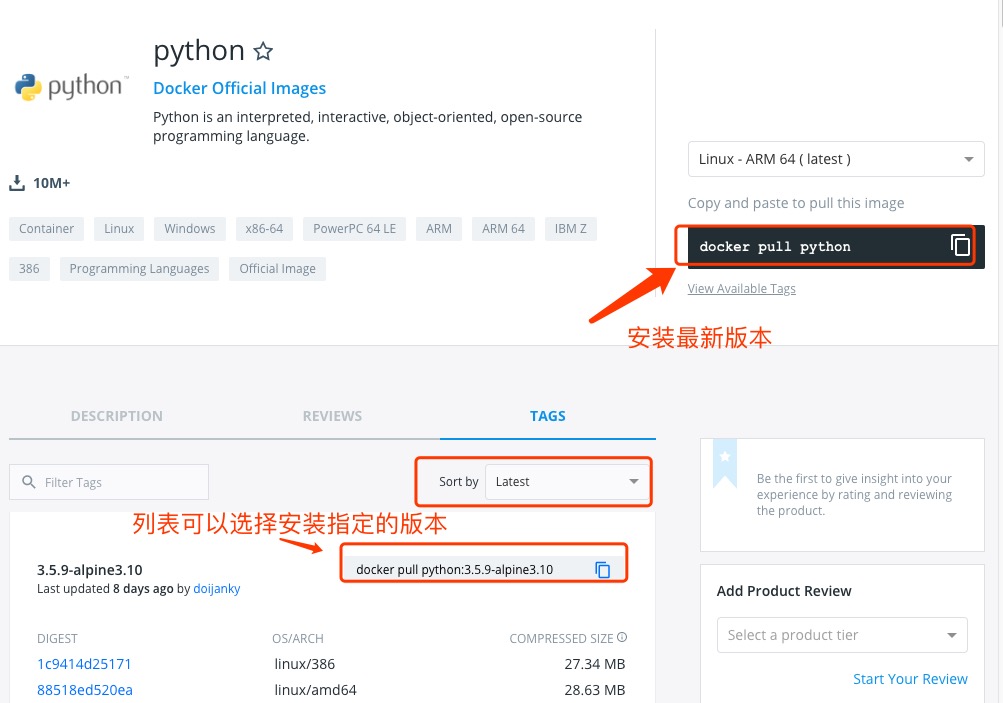
Vous pouvez utiliser Trier par pour afficher d'autres versions de Python ; la version par défaut est la dernière version.python:latest。
De plus, nous pouvons également utiliser la commande docker search python pour afficher les versions disponibles :
example@example:~/python$ docker search python
NAME                           DESCRIPTION                        STARS     OFFICIAL   AUTOMATED
python                         Python is an interpreted,...       982       [OK]
kaggle/python                  Docker image for Python...         33                   [OK]
azukiapp/python                Docker image to run Python ...     3                    [OK]
vimagick/python                mini python                                  2          [OK]
tsuru/python                   Image for the Python ...           2                    [OK]
pandada8/alpine-python         An alpine based python image                 1          [OK]
1science/python                Python Docker images based on ...  1                    [OK]
lucidfrontier45/python-uwsgi   Python with uWSGI                  1                    [OK]
orbweb/python                  Python image                       1                    [OK]
pathwar/python                 Python template for Pathwar levels 1                    [OK]
rounds/10m-python              Python, setuptools and pip.        0                    [OK]
ruimashita/python              ubuntu 14.04 python                0                    [OK]
tnanba/python                  Python on CentOS-7 image.          0                    [OK]
Ici, nous récupérons l'image officielle avec le tag 3.5
example@example:~/python$ docker pull python:3.5
Une fois le téléchargement terminé, nous pouvons trouver l'image avec REPOSITORY python et le tag 3.5 dans la liste des images locales.
example@example:~/python$ docker images python:3.5
REPOSITORY          TAG                 IMAGE ID            CREATED             SIZE
python              3.5              045767ddf24a        9 days ago          684.1 MB
Méthode 2 : Construire via Dockerfile
Créer un Dockerfile</p>
Tout d'abord, créez un répertoire appelé python pour y stocker les éléments associés plus tard.
example@example:~$ mkdir -p ~/python ~/python/myapp
Le répertoire myapp sera mappé sur le répertoire d'application configuré pour le conteneur python.
Entrez dans le répertoire python créé et créez un Dockerfile.
FROM buildpack-deps:jessie

# remove several traces of debian python
RUN apt-get purge -y python.*

# http://bugs.python.org/issue19846
# > At the moment, setting "LANG=C" on a Linux system *fundamentally breaks Python 3*, and that's not OK.
ENV LANG C.UTF-8

# gpg: key F73C700D: public key "Larry Hastings <[email protected]>" imported
ENV GPG_KEY 97FC712E4C024BBEA48A61ED3A5CA953F73C700D

ENV PYTHON_VERSION 3.5.1

# if this is called "PIP_VERSION", pip explodes with "ValueError: invalid truth value '<VERSION>'"
ENV PYTHON_PIP_VERSION 8.1.2

RUN set -ex \
        && curl -fSL "https://www.python.org/ftp/python/${PYTHON_VERSION%%[a-z]*}/Python-$PYTHON_VERSION.tar.xz" -o python.tar.xz \
        && curl -fSL "https://www.python.org/ftp/python/${PYTHON_VERSION%%[a-z]*}/Python-$PYTHON_VERSION.tar.xz.asc" -o python.tar.xz.asc \
        && export GNUPGHOME="$(mktemp -d)" \
        && gpg --keyserver ha.pool.sks-keyservers.net --recv-keys "$GPG_KEY" \
        && gpg --batch --verify python.tar.xz.asc python.tar.xz \
        && rm -r "$GNUPGHOME" python.tar.xz.asc \
        && mkdir -p /usr/src/python \
        && tar -xJC /usr/src/python --strip-components=1 -f python.tar.xz \
        && rm python.tar.xz \
        \
        && cd /usr/src/python \
        && ./configure --enable-shared --enable-unicode=ucs4 \
        && make -j$(nproc) \
        && make install \
        && ldconfig \
        && pip3 install --no-cache-dir --upgrade --ignore-installed pip==$PYTHON_PIP_VERSION \
        && find /usr/local -depth \
                \( \
                    \( -type d -a -name test -o -name tests \) \
                    -o \
                    \( -type f -a -name '*.pyc' -o -name '*.pyo' \) \
                \) -exec rm -rf '{}' + \
        && rm -rf /usr/src/python ~/.cache

# make some useful symlinks that are expected to exist
RUN cd /usr/local/bin \
        && ln -s easy_install-3.5 easy_install \
        && ln -s idle3 idle \
        && ln -s pydoc3 pydoc \
        && ln -s python3 python \
        && ln -s python3-config python-config

CMD ["python3"]
Créez une image via Dockerfile, et remplacez son nom par le vôtre :
example@example:~/python$ docker build -t python:3.5 .
Une fois créée, nous pouvons trouver l'image nouvellement créée dans la liste des images locales :
example@example:~/python$ docker images python:3.5
REPOSITORY          TAG                 IMAGE ID            CREATED             SIZE
python              3.5              045767ddf24a        9 days ago          684.1 MB
Utilisez l'image python.
Créez un fichier helloworld.py dans le répertoire ~/python/myapp, avec le code suivant :
#!/usr/bin/python

print("Hello, World!");
Lancer le conteneur
example@example:~/python$ docker run -v $PWD/myapp:/usr/src/myapp -w /usr/src/myapp python:3.5 python helloworld.py
Description de la commande :
-v $PWD/myapp:/usr/src/myapp:Montez le répertoire myapp du répertoire courant sur l'hôte vers /usr/src/myapp dans le conteneur.
-w /usr/src/myapp: Spécifiez le répertoire /usr/src/myapp du conteneur comme répertoire de travail.
python helloworld.py:Utilisez la commande python du conteneur pour exécuter le fichier helloworld.py dans le répertoire de travail.
Résultat de sortie :
Hello, World!autres extensions